

The Steps of 3D Visualization
While there are many different types of software that can be used in any given visualization process, the entire ordeal doesn’t necessarily have to be complicated. Yes, rarely will two visualizations follow the same process, but each will have the same basic steps.
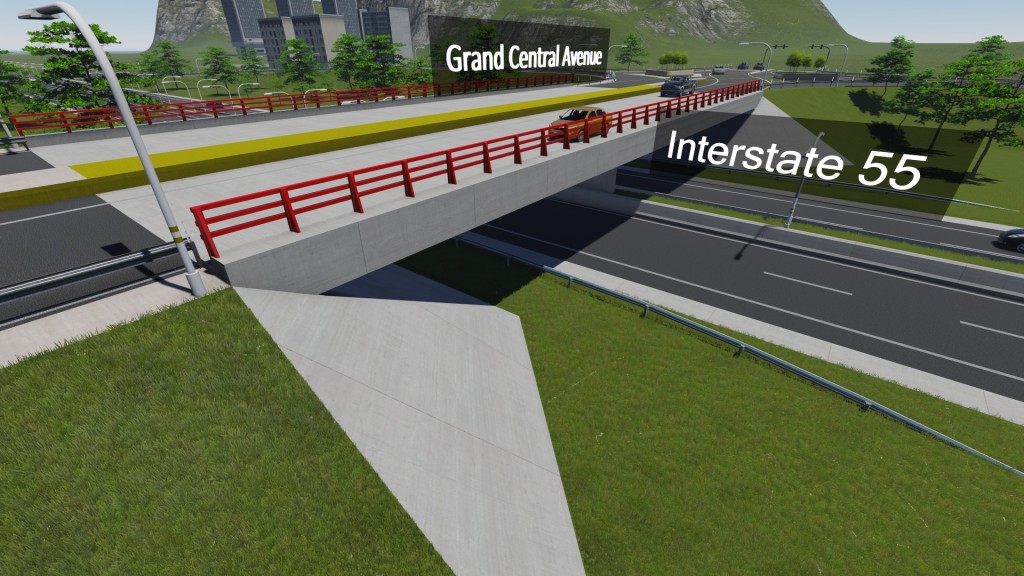
See the diagram below to see what I mean. There are only three basic steps to visualization (with one optional step I’ll cover first). Within each of these steps are the different software that can be used. I’ll break down the steps and then we will talk through a few examples.

0. (Optional) GIS
Sometimes it is necessary to grab the terrain and imagery for a specific location as well as other GIS information. If this is the case, the optional ‘Step 0’ is to use the software necessary (ArcGIS is very common) to grab this data and configure it in a way that the 3D modeling program of choice can handle it. Sometimes this is a LandXML export or sometimes it requires configuring shape files in Civil 3D for a .dwg export. This can be a frustrating step if you don’t have the experience or expertise to do it efficiently without a lot of R & D, so skip it if at all possible or, better yet, see if your client has the terrain and imagery already on file for the project.
1. 3D Modeling
There are some occasions where the CAD work will need to be done as part of the visualization process, but typically it is done as part of the engineering design process and that is an assumption in the outline of these steps. Additionally, 3D modeling isn’t always based off of CAD data, but you have to be prepared to model from CAD files as it is often necessary. Sometimes parts of the project will be modeled in 3D (like cut and fill sections) and can be imported as objects or surfaces, but other times (striping is a good example) the data will likely be in 2D and have to be draped as part of the modeling process. InfraWorks has been my go to in modeling for roadway projects (although I am trying to break free from the dependency as it is limited) but Sketchup is also a great tool as well as 3ds Max, Civil 3D, Microstation or even Revit. Yes, there are tons of other 3D modeling programs, but these are the most common in civil engineering.
2. Visualizing (Rendering)
I’m calling this step visualizing (rendering) rather than just rendering because it often entails much more than just pushing the render button. While texturing is often done during the modeling step, it is actually more of a visualization sub-step and can be done after the modeling is finished. Adding lighting as well as vegetation, mountains (or environment mapping), animated cars and people and more can also be part of the visualization step as well. If you use game engines for your rendering and interactive presentations as I have been with Lumion (and as most will be using in some form or another in 5 or so years, I predict), the visualization is completely separate from the 3D modeling and, typically, much easier. Texturing, environment settings, animating and more can be done relatively quickly and without a degree in animation from a university. Yes, there are times when a game engine won’t cut it and you have to use something like 3ds Max, but more often than not, Lumion or something similar can probably do a pretty good job at this step. As far as traditional rendering, many of the modeling programs have it built-in so you can complete two steps with a single software program. 3ds Max, Civil 3D, Microstation, Revit and Blender are also examples of 3D modeling programs that have built-in render engines although it isn’t real time like game engines.
3. Editing
Rare will be the scenario when you grab a picture or video hot off the rendering press and send it off to the client or project manager. In nearly every case, additional editing will be required. For images, this is commonly done in Photoshop (although I love the free GIMP). When working with video, the raw render files are edited, stitched together and combined with titles, music and even live video. Additional effects can even be added using software such as After Effects (somewhat of a video version of Photoshop) to really take your videos to the next level.
Once you are done editing your files, you can now deliver them to the client, project manager or even upload them online to YouTube or other media hosting sites.
Workflow Examples
As you can see, there are many different ways you can move through the steps of 3D visualization. In a recent project, I actually used InfraWorks for the GIS (the new Model Builder feature is in beta but has potential) and use a combination of Sketchup and Revit for the modeling. I combined these elements in Lumion for adding textures, cars, people and animating for final rendered video. I then used PowerDirector (video editor) to speed up a few clips, add sound and titles and export to a file ideal for YouTube upload (although most work with the site these days).
Another project involved taking data from Sketchup and InfraWorks and combining them in Navisworks for animating and final rendering before tying things up with PowerDirector.
And finally, one of the most common methods is simply using something like 3ds Max for the entire process as it can do 3D modeling, texturing, modeling, titles and special effects. This is the process of the pros so if you don’t know the software, know what you are getting into before you start!
The whole purpose of all of this is this, in my mind, is to find the best process for any particular project as no two will be the same. Understanding these steps will help you best serve the client with the most efficient and highest quality deliverable available for the cost.
Have you followed the steps of 3D visualization recently? Let us know what it was in the comments below!
Image credit: This one is me! (AKA Civil FX Studios)